 |
| Image by anacathie at Deviant Art |
Wednesday, October 31, 2018
Sunday, August 26, 2018
Come To Me, My Darlings
Hocus Pocus is among my top 5 favorite Halloween movies. A few years ago, I came across a custom vinyl figure collection of the Sanderson sisters. They were really well done, but the price tag was a bit hefty for me because they weren't original Funko figures. Since then, I have been longing for Funko to come out with them. I have been waiting...and waiting...and waiting...
Well, this year they have finally arrived! Spirit Halloween got the exclusive. I pre-ordered them right away. I have a Trick 'r Treat Sam Funko Pop vinyl figure and I managed to get the final remaining ones at regular price. I bought one for myself and the other for my nephew. He was Sam at my wedding. They are now retired and very difficult to find. If you do manage to find one you're going to spend a pretty penny. I was not risking missing out on these.
They arrived yesterday and I couldn't be happier with them. It's the 25th anniversary and there is so much cool Hocus Pocus merchandise coming out. I've got my eye on the Target exclusive DVD coming out with the limited edition 40-page gallery book. I also want the hardcover Hocus Pocus all-new sequel book on Amazon.
If you like to collect these vinyl figures and/or love Hocus Pocus go to Spirit Halloween and pick up the set. It's $36.99 for the set. They have a 20% off promo code right now. They should show up in the Spirit retail stores too, but I can't guarantee that. They have lots of other Hocus Pocus brand items as well.
Until next time my peculiar friends...
Well, this year they have finally arrived! Spirit Halloween got the exclusive. I pre-ordered them right away. I have a Trick 'r Treat Sam Funko Pop vinyl figure and I managed to get the final remaining ones at regular price. I bought one for myself and the other for my nephew. He was Sam at my wedding. They are now retired and very difficult to find. If you do manage to find one you're going to spend a pretty penny. I was not risking missing out on these.
 |
They arrived yesterday and I couldn't be happier with them. It's the 25th anniversary and there is so much cool Hocus Pocus merchandise coming out. I've got my eye on the Target exclusive DVD coming out with the limited edition 40-page gallery book. I also want the hardcover Hocus Pocus all-new sequel book on Amazon.
 |
| The hideaway books in the background came from The Dollar Tree |
Until next time my peculiar friends...
Thursday, June 28, 2018
Hallowedding 2016: DIY Centerpieces - Part 1
Halloween items started hitting the stores in August that year and the wedding was very near, so we went out to the local stores to get DIY ideas. One of our first stops was at our local Dollar Tree. We looked at the traditional vases and mirrors, but they were small and we would have needed several per table to fill the space. Even at a dollar apiece, the price was really racking up and we didn't even have the stuff to fill them with yet.
My bride-to-be found these very nice clear glass candle holders and plates. She had the ingenious idea of gluing them together to make standing platters. This would make the centerpieces larger, but not too tall, and we'd need only one per table. We could paint them black and just make smaller items to fill the extra table space. We decided to sit on the idea for an evening before we bought anything.
 | |
|
 |
| Glass Candle Holder for $1.07 after tax at Dollar Tree. |
After going to a few other stores and collecting ideas we ended the evening grocery shopping at the local Walmart. I was looking for a pack of paper plates for the house when I spotted these two items below. My brain spins in a lot of crazy directions on DIY shopping day. These trips can produce some very amazing creative ideas and some very strange terrible ones too.
 |
| Chinet Cut Crystal 10" Plastic Plates 20ct for $4.98 plus tax at Walmart. Solo 9oz. clear plastic drinking cups 40ct for $3.98 plus tax at Walmart. |
The plates had a nice decorative edge, were sturdy, lightweight and the right number in the package. The 9oz cups were a perfect height and turned upside down would be very sturdy. I got very excited as I had just created centerpiece platters for less than $10 for all 20 tables. It was going to cost us $43 to make ones using the Dollar Tree glassware. While nice, we would have been stuck with trying to get rid of the glassware because I mean, where was I going to store them. At least this way we could dispose of them or give them away without guilt. We were going to paint the glassware black and we could still do that with these. Now all I had to do was convince the bride-to-be. Luckily, I didn't have to try very hard at all. She loved the idea. It was super crafty and we saved money!
I went home and got out my trusty e6000 because that's what you use when you don't want your stuff coming apart ever again. Once the gluing was done we stacked them and left them to cure overnight.
 |
| Chinet Plates and Solo Cups glued together with good ole trusty e6000. |
Next, we needed to paint them black. Can you guess what I used? ...that's right... Spray paint! Everyone knows how much I love this stuff. I used Krylon Black with a Satin Finish. These platters were not the main attraction, so I wanted something prettier than a matte but without too much shine.

And here is the result...
 |
| Simple but tasteful |
Back to the Dollar Tree to find some inexpensive Halloween trinkets to put on these platers. We debated on spider webbing or creepy cloth for the base of the platter top. Creepy cloth won. Spider webbing is nice but can be a bit tacky and is entirely overused.
 |
| Creepy Cloth from Dollar Tree. One can never have enough. |
We bought several of these, in both grey and black, because I always add more to my stash every year. One can never have enough creepy cloth. We only cut up a few into smaller pieces and stretched them a bit to warp them. Then we laid each piece on top of the platters allowing them to droop off the edges a bit.
I knew I wanted skulls on the platters but really decent looking ones can be rather expensive and I needed 20 of them. So we found some really cheesy looking ones at the Dollar Tree. I bought a case of 24. I figured we were creative, we could figure out how to fix them up. And we did after a few trials-and-errors.
 |
| Dorky Dollar Tree Skull from Dollar Tree. Needs a serious facelift. |
We had 4 extra skulls to play with. First, we tried to dry bush them to see if we could creep them up. However, they were very cream colored and it took a lot of effort to get something we were semi happy with. Then we thought, what if we cut out the eyes, slit the top open, cut out a tooth or two and put a flameless flickering candle inside? Again it was a lot of effort. It didn't look half bad, but we still weren't quite pleased with it.
So of course, I brought up spray paint. Of course, I did. Bride-to-be was a little discouraged at this point and was willing to try anything. We talked about colors. We knew we had a lot of orange and black going on with the decorations and wanted something to stand out. We went with orange but also added in purple and green.
I spray painted the skulls and it tremendously improved the dorky looks on their faces. The bride-to-be was happy. However, Raven Fallweather (bride), being the glitter queen that she is decided they needed some magic and sparkle. The venue we chose for our event had a very strict policy against glitter, so we bickered a bit on how to accomplish this. I told her we'd have to seal them to prevent the glitter from flaking and again it seemed like it was starting to take too much effort. Mod Podge to the rescue! They make an extreme glitter version that dries clear, doesn't flake and didn't destroy the look of my nice paint job.
 |
| Here are the colors we went with. In the dim light, the key lime looks less yellow. |
 |
| Painted Skulls before Mod Podge Glitter is brushed on. They don't look so dorky now. |
 |
| Drying remaining skulls on stacked painted platters. |
The Final Result on HalloWedding Day...


The Modge Podge Glitter did not photograph well, but in person, it was a beautiful, subtle touch. It also ended up on all the decorations. Also pictured you will notice that we still went with a flameless flickering tealight candle on the platter. The light-up skeleton hand candle torches were given to us by a dear close friend as a wedding gift. We also had tons of leftover styrofoam glitter bones, pumpkins, and spiders from our Halloween tree decorations that we bought one year. We threw those in for effect along with some plastic bugs we purchased at Dollar Tree.
The small lanterns shown in the last picture above will be in another post, but to be honest, these were not our original idea, we just enhanced the project to suit our need. I'll be linking to the original blog we found them on in the next centerpiece article (fingers crossed that I can find it again so I can credit them appropriately.)
Well, I hope you enjoyed this post. Stay peculiar and I'll see you next time!
Thursday, March 8, 2018
New Trinket...
I got a really cool thing in the mail today, Oddlings!
(Well I ordered it and I knew it was coming, but still very cool.)
 |
| Cool & shiny wrapper encasing the awesomeness |
In June of 2016, I discovered this really neat online store called Dead on Paper. This online shop sells custom-designed coins and playing cards. They also sell prints of their designs.
I believe, I discovered this shop during one of my rabbit hole searches for hobo coins. Hobo coins are an art form of altering images on metal coins, oftentimes, nickels because of their size, thickness, and softness. While the coins designed on this site are not actual hobo coins, but representations of this art form, they are gorgeous works of art.
A couple days ago Dead on Paper released their second series of hobo coin designs. Naturally, I wanted all of them. However, I do like to pace myself. So this time, I chose The Davey Jones Locker Coin. This one was designed after the 1919 S Wheat Penny. But don't let that fool you, these coins are a little larger than US Dollar coins and weigh about as much as 5 US quarters. Each coin comes in 4 different finishes: Antique Silver, Antique Bronze, Solid Copper, and Antiqued Brass Plated Steel. I had a hard time deciding between the antique bronze or the solid copper. Seriously, it took me like an hour going back and forth between pictures to decide. In the end, I really like the design in solid copper. I envisioned giving it a green faux patina...we'll see.
 |
| The Davey Jones Locker Hobo Coin: Front |
 | |
|
 |
| Air-Tite Coin Holder H39 |
As a collector of the strange and unusual ("for I, myself am strange and unusual") I feel these beautifully crafted coins are perfect additions to my hoard.
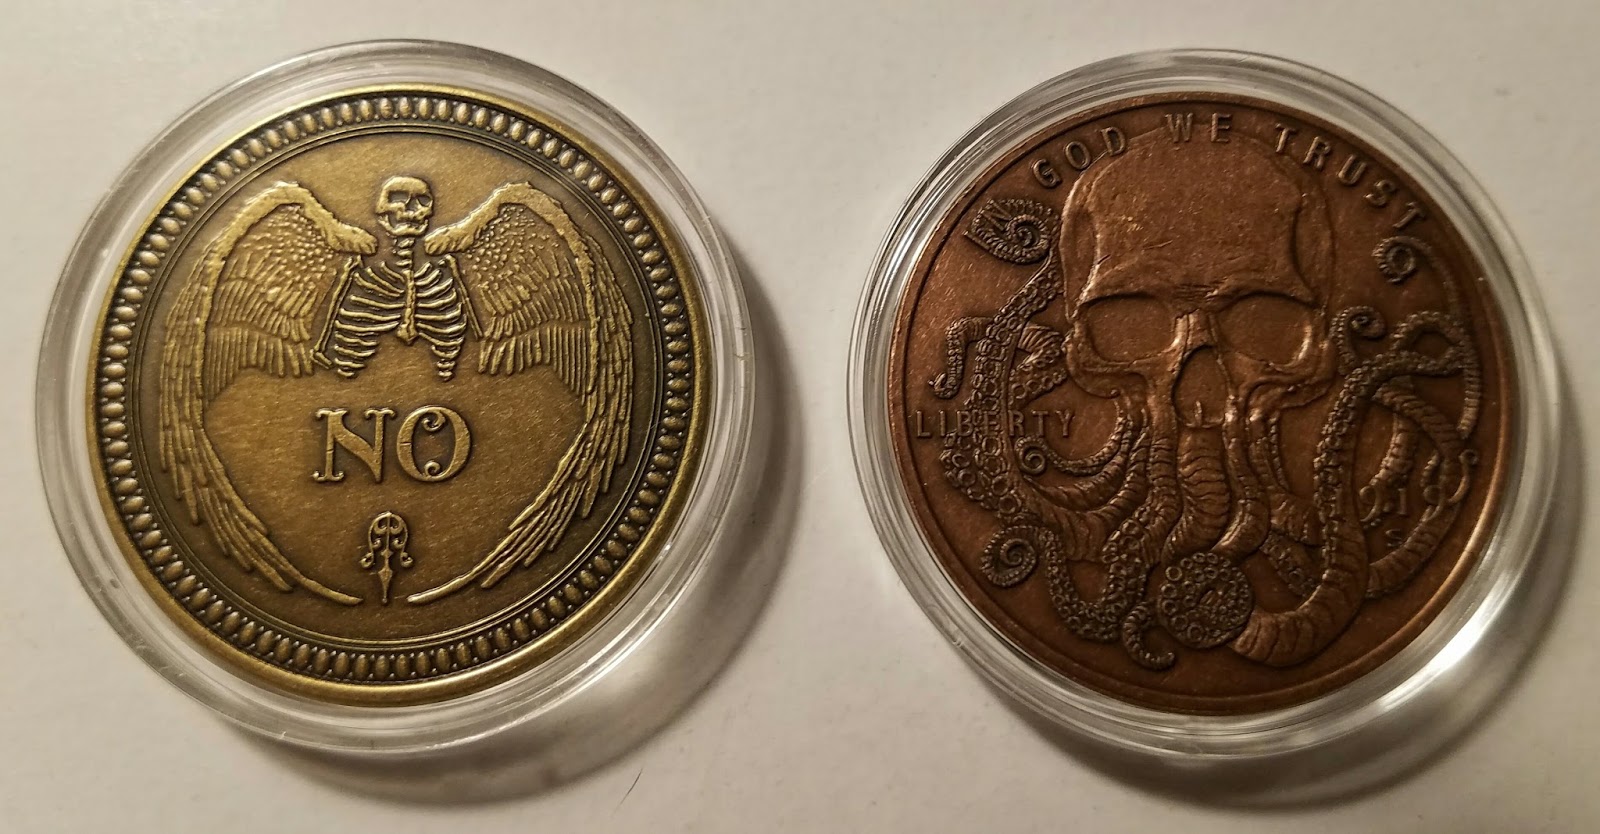 |
| Left: Front of Antique Bronze Oracle Coin bought in 2016 Right: Front of Solid Copper Wheat Penny Coin bought in 2018 |
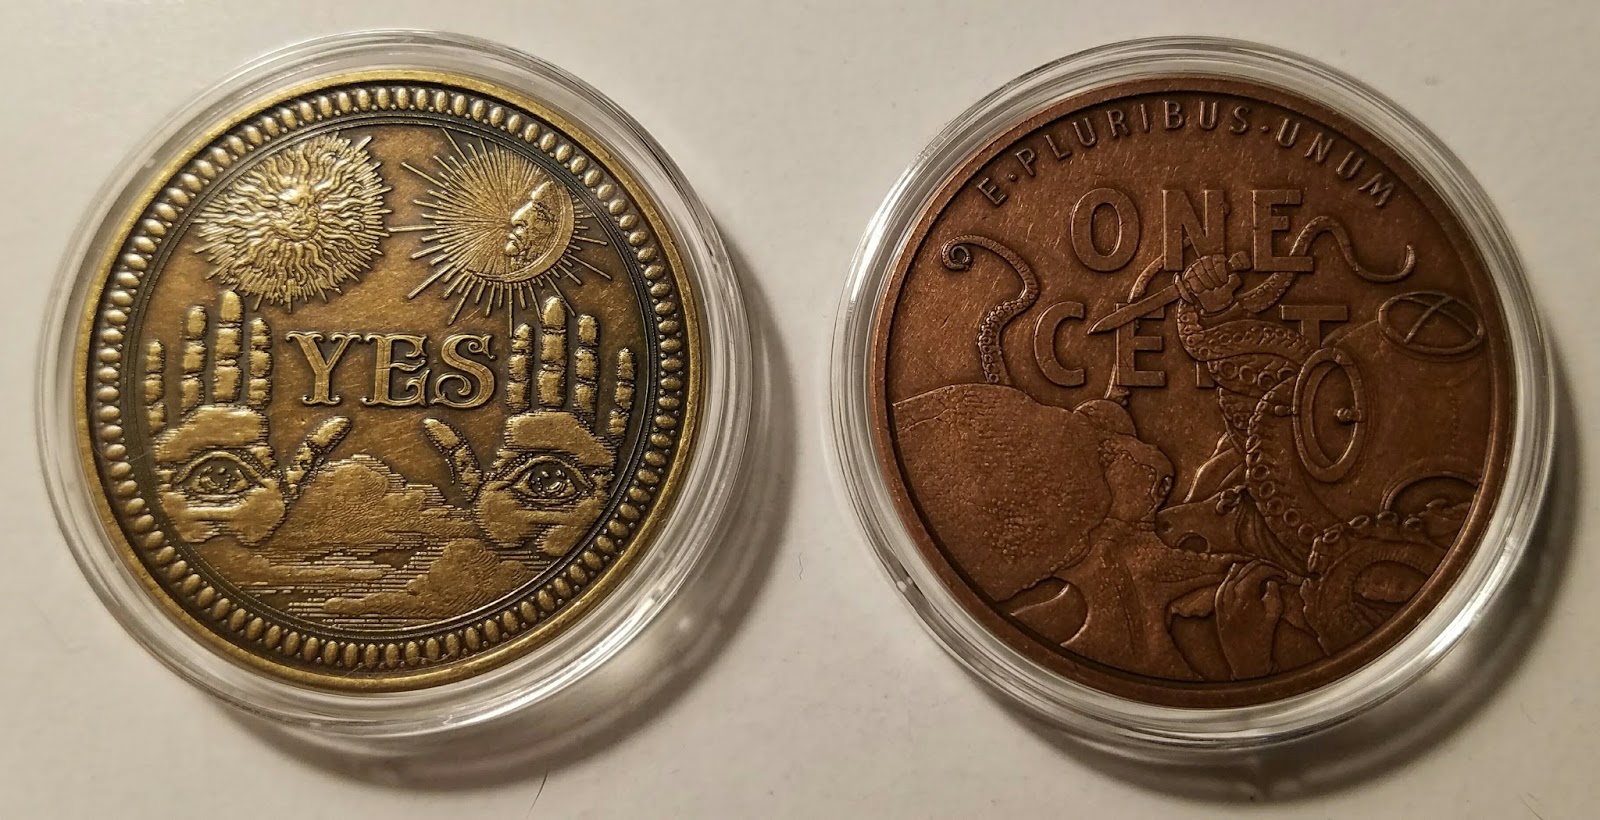 |
| Left: Back of Antique Bronze Oracle Coin bought in 2016 Right: Back of Solid Copper Wheat Penny Coin bought in 2018 |
Well, I hope you enjoyed my little Show-and-Tell. Until next time my fine peculiar friends...
Wednesday, January 10, 2018
9 Drawer Apothecary Cabinet Project - Phase 1
Several years ago, while sifting through my local thrift shop, I picked up this unpainted 9-drawer cabinet for $5. The top had come loose but was otherwise in perfect condition. It had been sitting around the house for ages before I got the bug to fix it. I got out the trusty E6000, lined up the pegs, and glued the top back down. The whole cabinet will fall apart before that top will ever come off again. Then I set it down beside my desk for me to stare at for another year or so, whilst I figured out what to do with it.
Now, I had planned to fill in the holes where the knobs once were and sand it down. However, in my haste and eagerness to paint them with the new color, I completely missed that step. I was so pleased with the paint job, that I didn't have the heart to strip it down and do it all over again. Besides, the nameplates would just cover over that once you put the paper in. Speaking of which, it was time to put the nameplate drawer pulls on. But when I placed the drawer pull up for color match, I was rather disappointed. Ugh. Well, now what?


 |
| Cabinet after I had glued the top and already started taking off the knobs. |
Last spring, I was shopping the clearance bins at my local Hobby Lobby and found three packages of these nameplate drawer pulls for $2.00 each. I immediately thought of the cabinet and I purchased them. I brought them home to measure up against the drawer fronts to see if they would fit. If they didn't then they would just go in my odds & ends collection bin. As you can probably imagine, this bin has grown exponentially over the years. They were a perfect fit. So naturally, the cabinet sat beside my desk and the drawer pulls laid on my desk for another several months.

I was thinking I might put this cabinet in the apothecary bathroom of my house. This brought me to the conclusion that I wanted to color the cabinet in a dark brown to match the accents in the room. However, I just couldn't decide if I wanted to sand and stain the cabinet or if I wanted to spray paint it. Oh, how I do love to spray paint. Rustoleum and Krylon are my favorite brands. I get better coverage and less chipping and flaking...not to mention they have a wide range of color choices.
I was perusing the spray paint aisle at Walmart and came across this beautiful metallic "flat burnished amber" color. It was a nice deep brown color which I had been using for accents in the bathroom. But I'm also a bit of a steampunk fan, so I really loved that it also had a metallic sheen to it.

I took out the drawers and gave the cabinet a couple coats of this beautiful color and was not disappointed in the least. I couldn't have been more pleased with how it turned out. The picture below really doesn't do it justice.
I knew I wanted the drawers to be a different color, but initially, I was thinking a lighter shade of brown. And now that I was in the Steampunk mindset, I wanted a different metallic texture as well. I had recently painted something with a hammered metal black spray paint and really loved the texture of that. However, I didn't want to use black on the drawers. For me, black can be too easy of a color to use and for this project, black just wouldn't do.
I went back to Walmart and looked through the spray paint aisle again and found a "hammered brown". It wasn't quite what I was thinking, but I compared the color of the two tops of the paint to see if they would work well together and at the time they did. However, when I tested the hammered brown on a scrap piece of wood, the color just did not look like it does on the can.
So I was back at Walmart looking at more spray paint. I still had the Steampunk mindset and was looking at metallic colors and still wanted a hammered finish. I found a "hammered copper" color. I love copper. I love the hammered finish. Sold! I brought it home, tested it, loved it, and started painting the outside of the drawers. This was a fantastic choice!


I was thinking I might put this cabinet in the apothecary bathroom of my house. This brought me to the conclusion that I wanted to color the cabinet in a dark brown to match the accents in the room. However, I just couldn't decide if I wanted to sand and stain the cabinet or if I wanted to spray paint it. Oh, how I do love to spray paint. Rustoleum and Krylon are my favorite brands. I get better coverage and less chipping and flaking...not to mention they have a wide range of color choices.
I was perusing the spray paint aisle at Walmart and came across this beautiful metallic "flat burnished amber" color. It was a nice deep brown color which I had been using for accents in the bathroom. But I'm also a bit of a steampunk fan, so I really loved that it also had a metallic sheen to it.

 |
| Top/Side Profile. I tried to capture the metallic sheen in the sunlight. |
I knew I wanted the drawers to be a different color, but initially, I was thinking a lighter shade of brown. And now that I was in the Steampunk mindset, I wanted a different metallic texture as well. I had recently painted something with a hammered metal black spray paint and really loved the texture of that. However, I didn't want to use black on the drawers. For me, black can be too easy of a color to use and for this project, black just wouldn't do.
I went back to Walmart and looked through the spray paint aisle again and found a "hammered brown". It wasn't quite what I was thinking, but I compared the color of the two tops of the paint to see if they would work well together and at the time they did. However, when I tested the hammered brown on a scrap piece of wood, the color just did not look like it does on the can.
So I was back at Walmart looking at more spray paint. I still had the Steampunk mindset and was looking at metallic colors and still wanted a hammered finish. I found a "hammered copper" color. I love copper. I love the hammered finish. Sold! I brought it home, tested it, loved it, and started painting the outside of the drawers. This was a fantastic choice!

 |
| Drawer Front color in the sunlight. Beautiful color, but texture got lost in the sun. |
 |
| Drawer Front color indoors. Better view of its texture. |
Now, I had planned to fill in the holes where the knobs once were and sand it down. However, in my haste and eagerness to paint them with the new color, I completely missed that step. I was so pleased with the paint job, that I didn't have the heart to strip it down and do it all over again. Besides, the nameplates would just cover over that once you put the paper in. Speaking of which, it was time to put the nameplate drawer pulls on. But when I placed the drawer pull up for color match, I was rather disappointed. Ugh. Well, now what?
 |
| Unpainted namplate drawer pull on hammered copper drawer front. Yuck! Very unimpressive. |
Then I remembered I had that can of hammered brown spray paint I'd bought for the drawers that didn't work out. So I tried painting the nameplates with it and lo and behold I liked it better. I wasn't completely keen on the color, but I did like the texture matching up with the drawer. After getting several opinions from my Odd-fellows whom all loved it, I decided to stick with it.

 |
| In comparison, painted nameplate looks better than its original color. |
Next, it was time to affix the nameplates to the drawers. They all came with screws so I used a drill gauge to find out how big the screws were and what size drill bit I should use. And because I like to only do things right the first time. I sat down and did my measurements and math to make a paper template for drilling the holes. Success!
 |
| Used a drill gauge to determine screw and drill bit size. |
 |
| Made and used a paper template to drill holes and ensure uniformity of nameplates on all the drawers. |
 |
| Phase 1 complete! |
I'm very pleased with the results and quite proud of it. Yet, I still feel like the project is unfinished. The inside of the drawers are still unpainted and it needs more embellishment on the outside of the cabinet. I am still mulling it over. Please, feel free to offer me any suggestions or let me know what you think of it.
As of right now, Phase 1 is complete. I'll post a Phase 2 blog when I ever decide to finish it. Right now, it's setting in my dining room holding our scent waxes.

Until next time my peculiar friends...
Monday, January 1, 2018
Bloody New Year!!!

Happy Bloody New Year from Me & my Oddball Clan to yours.
May all of your exquisite nightmares come true this year.
Subscribe to:
Posts (Atom)